
Using the DigitalOcean API with Node.js and programatic SSH
Tutorial: Create DigitalOcean droplets, generate SSH keys and run SSH commands all within Node.js

Automation is the foundation to create a repeatable, consistent configuration of servers in the cloud. At Zaro we dive right in to automation to minimise the amount of errors, bottlenecks and time spent.
In this tutorial, I'll show you how to get up and running with programming your DigitalOcean infrastructure using Node.js. We'll cover making HTTP requests, generating SSH keys and running SSH commands within your JavaScript application.
We'll assume you know what DigitalOcean is and how it works and you've written JavaScript applications for Node.js before.
1. Get your Digital Ocean API key
First you need to generate an API key to access your account. Do this in the Digital Ocean control panel under API > Generate New Token.
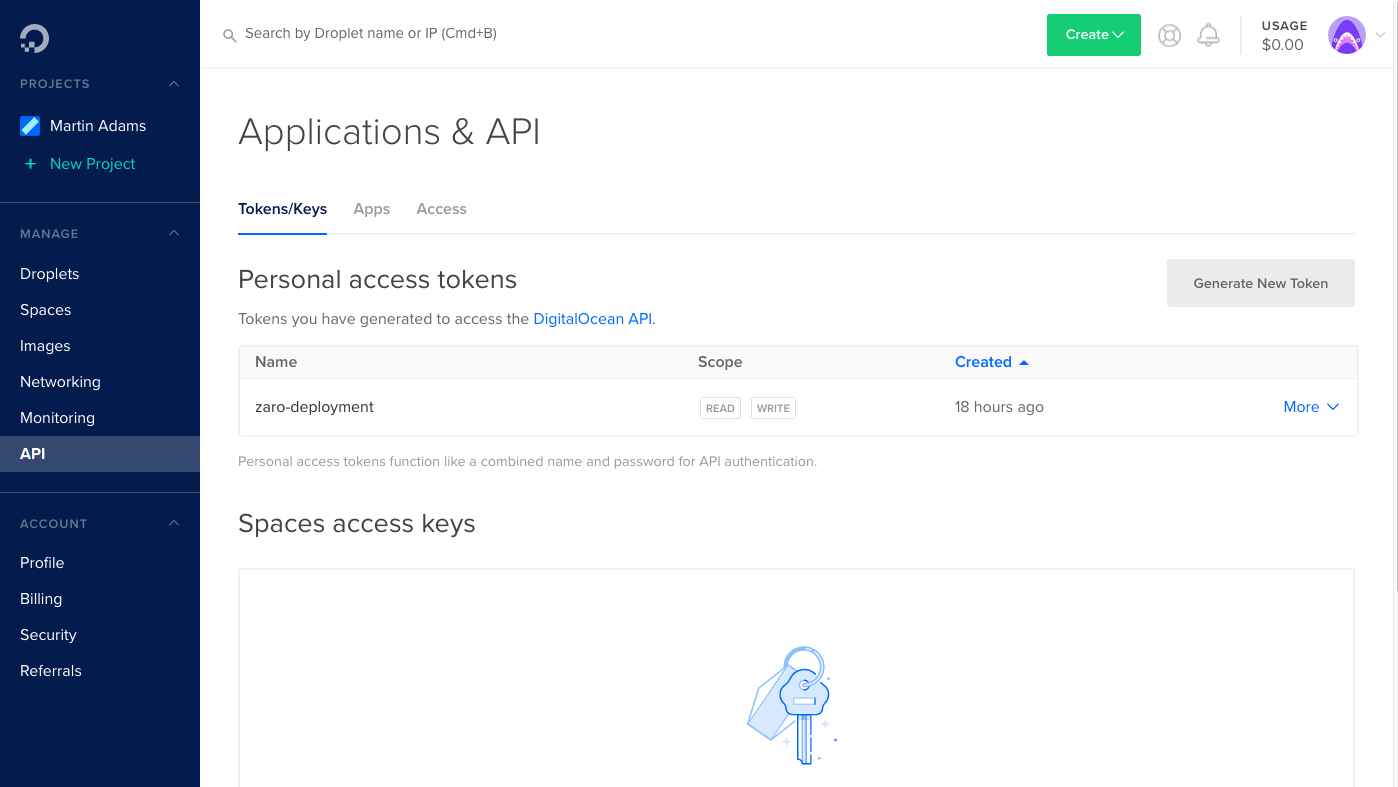
You will be shown the API key, you must save this somewhere secure as you cannot get it again. If you lose it, you need to generate a new key.
2. Create a .env file in your project
You must never store your API key in your source code and check this into somewhere like GitHub. This is a very sensitive piece of data, especially as it could mean someone creating internet hosted servers in your name and you pay have to foot the bill.
To avoid this, we will create a .env file in your project and store the key there.
my-project/.env
DO_TOKEN=aabbccddeeffgghhiijjkkllmmnnooppqqrrssttuuvvwwxxyyzz112233Then add this to your .gitignore file so that it never gets checked into your git repository. Make sure you save this key securely someone else that no one else can view it.
my-project/.gitignore
.env
node_modules/
3. Load your .env file in your Node app
To use this .env file, we will load it into our application using a package called dotenv so we can access it via process.env.DO_TOKEN variable. You can of course pass the environment variable in via different methods if you are familiar how to do so.
import dotenv from "dotenv";
dotenv.config(); // Do this as early as possible
4. Making HTTP requests to the DigitalOcean API
We'll use the request package and a version that supports promises called request-promise-native. This will make it easy to call the DigitalOcean API.
Here is an example how we get details about our account.
import dotenv from "dotenv";
import rp from "request-promise-native";

dotenv.config();

const _GET = path => {
    return rp({
        method: "GET",
        uri: `https://api.digitalocean.com/v2${path}`,
        headers: {
            Authorization: `Bearer ${process.env.DO_TOKEN}`,
            "Content-Type": "application/json"
        },
        json: true
    });
};

const getAccount = () => _GET("/account");

// Let's get our account
(async () => {
  try {
    const account = await getAccount();
    console.log(account);
  } catch (ex) {
    console.error(ex);
  }
})(); // Run out sync code
The above code is a really simple way to send a GET request to the API using our API token. The DigitalOcean API will return a json object which you can then inspect and process accordingly.
5. Generate SSH keys for a new droplet
Before we can create a new droplet, we need to generate the SSH keys for it so we can programmatically access the server. To achieve this, we'll use the ssh-keygen and the fs packages. We'll store the keys in a .keys folder in the project — make sure you add .keys/ to .gitignore!
import keygen from "ssh-keygen";
import fs from "fs";

const generateKeys = async () => {
    return new Promise((fulfill, reject) => {
        // This is where we'll store the public and private keys
        const path = process.cwd() + "/.keys/";
        const location = path + "digitalocean_rsa";
        const comment = "youremail@example.com";

        // Make sure the .keys folder exists
        if (!fs.existsSync(path)) {
            fs.mkdirSync(path);
        }

        // Now generate the key
        keygen(
            {
                location: location,
                comment: comment,
                password: null, // No password as we're automating usage
                read: true
            },
            function(err, out) {
                if (err) {
                    reject("Error creating SSH key: " + err);
                    return;
                }

                fulfill({
                    privateKey: out.key,
                    publicKey: out.pubKey
                });
            }
        );
    });
};

(async () => {
  try {
    const { privateKey, publicKey } = await generateKeys();

    console.log('Private Key:', privateKey);
    console.log('Public Key:', publicKey);
  } catch (ex) {
    console.error(ex);
  }
})();
6. Creating a droplet using the SSH public key
Now that we a new private and public key, we can create a new droplet using it.
const _POST = async (path, data) => {
    const request = {
        method: "POST",
        uri: `https://api.digitalocean.com/v2${path}`,
        headers: {
            Authorization: `Bearer ${TOKEN}`,
            "Content-Type": "application/json"
        },
        body: data,
        json: true
    };

    return await rp(request);
};

const createDroplet = data => _POST("/droplets", data);
const { privateKey, publicKey } = await generateKeys();

// Save the public key in DigitalOcean and get the id of it
const keyResult = await createKey({
    name: "test-key",
    public_key: publicKey
});
const keyID = keyResult.ssh_key.id;

console.log("Created key", keyID);

// Create the droplet using the key
let result = await createDroplet({
    name: "test-droplet",
    region: 'lon1',
    size: 's-1vcpu-1gb',
    image: 'ubuntu-18-04-x64',
    ssh_keys: [keyID],
    tags: ["deploy-test"]
});
Now, you may be wondering how we knew to use the lon1 region, s-1vcpu-1gb size and ubuntu-18-04-x64 image. Good news is that DigitalOcean have API endpoints that allow you to query these. You can even query things like the price of a size option.. In the above example, I've selected a $5 a month 1 VCPU, 1GB RAM droplet running Ubuntu 18.04 in the London datacenter.
7. Waiting for the droplet to come online
Once the droplet has been created, you need to wait for it to come online before we can SSH into it. To do this, we will poll every 5 seconds the status of the droplet and wait for it to change from new to active.
const getDroplet = id => _GET(`/droplets/${id}`);

const sleep = async ms => {
    return new Promise(f => {
        setTimeout(f, ms);
    });
};
const { privateKey, publicKey } = await generateKeys();

const keyResult = await createKey({
    name: "test-key",
    public_key: publicKey
});
const keyID = keyResult.ssh_key.id;

console.log("Created key", keyID);

// Create the droplet using the key
let result = await createDroplet({
    name: "test-droplet",
    region: 'lon1',
    size: 's-1vcpu-1gb',
    image: 'ubuntu-18-04-x64',
    ssh_keys: [keyID],
    tags: ["deploy-test"]
});

const dropletID = result.droplet.id;
console.log("Created droplet", dropletID);

// Wait for it to come online
let droplet = null;
do {
    await sleep(5000);
    const result = await getDroplet(dropletID);
    droplet = result.droplet;
    console.log("Droplet status: " + droplet.status);
} while (droplet.status === "new");

if (droplet.status !== "active") {
    throw "Droplet had the status " + droplet.status;
}

// Get the public IPv4 address
let dropletIP = null;

// The droplet is online
droplet.networks.v4.forEach(eth => {
    if (eth.type === "public") {
        dropletIP = eth.ip_address;
    }
});

if (dropletIP === null) {
    throw "Unable to get public IP address";
}

console.log("Droplet is online with IP " + dropletIP);
We now have a new DigitalOcean droplet, set up with key authentication and retrieved its public IPv4 address.
Next we move on to using it via SSH in Node.js.
8. Connect using SSH using Node.js
We're going to use the ssh2 node package to communicate with our server over the SSH protocol.
Let's start by introducing 3 helper functions, sshConnect, sshExec and sshDisconnect.
import ssh2 from "ssh2";

let sshConn = null;
// Connect to an SSH server with a host, username and privateKey
const sshConnect = (host, user, privateKey) => {
    return new Promise((fulfill, reject) => {
        var sshConfig = {
            host: host,
            port: 22,
            username: user,
            privateKey
        };

        sshConn = new ssh2.Client();
        sshConn
            .on("ready", () => {
                fulfill();
            })
            .on("error", err => {
                reject(err);
            })
            .connect(sshConfig);
    });
};

// Execute a command on the SSH server
const sshExec = cmd => {
    return new Promise((fulfill, reject) => {
        let stdout = "",
            stderr = "";
        sshConn.exec(cmd, function(err, stream) {
            if (err) {
                reject(err);
                return;
            }

            stream
                .on("close", function(code, signal) {
                    fulfill({
                        out: stdout,
                        err: stderr,
                        code,
                        signal
                    });
                })
                .on("data", function(data) {
                    stdout += data;
                })
                .stderr.on("data", function(data) {
                    stderr += data;
                });
        });
    });
};

// Disconnect from the SSH server
const sshDisconnect = () => {
    return new Promise((fulfill, reject) => {
        sshConn.end();
    });
};
Now that we have our SSH helper functions, we will use our previously created SSH keys and droplet to connect and run a simple whoami command.
// Connect to the server using SSH
await sshConnect(dropletIP, "root", privateKey);
console.log(`Connected to ${dropletIP}`);

// Run a simple command
console.log('> whoami');
const { out: whoamiResponse } = await sshExec("whoami");
console.log(whoamiResponse); // Output: root

await sshDisconnect();
You can of course use a different ssh library if you prefer which has simpler support for sending and receiving files.
In Summary
I hope you've enjoyed this article which introduces you to the concepts of remotely creating and accessing a cloud server using DigitalOcean and Node.js. Do check out Zaro and how it can benefit you as a software engineer.
References: